Optimizing images
What is image optimization?
Optimizing or compressing an image means reducing the file size as much as possible while still maintaining the image quality. The reason for optimizing an image is to reduce the time it takes to load the webpage and to improve image SEO.
When to optimize images
Images should always be optimized when created for digital experiences.
How to optimize images
Image size and file size are not the same things. Image size refers to the dimensions of an image. File size refers to the storage space. File size is measure in kilobytes (kb) or megabytes (mb).
Images will vary in dimension and complexity. You will need to determine how much you can reduce file size without compromising the quality. Images for the web should always be saved at a resolution of 72ppi (pixels per inch).
There is no set file size range, since images will vary in dimension and complexity. When optimizing images, the creator will have to reduce the file size as much as possible without sacrificing the image quality.
Even when exported at 2x, most images within AEM should be 100kb or less and hero images should be 100kb-300kb. As a rule of thumb, even the largest and most complex static image shouldn’t exceed 300kb.
Retina imagery
Retina imagery, or 2x, is exporting your image at twice the height and width then necessary. For example, if your target image size is 600x400px, the image should be created and exported at twice the dimensions at 1200x800px and at 72ppi.
Images should be exported at 2x for two reasons:
- The image will be easy to scale to larger sizes
- The image will look crisp on retina devices, such as most phones and Apple devices
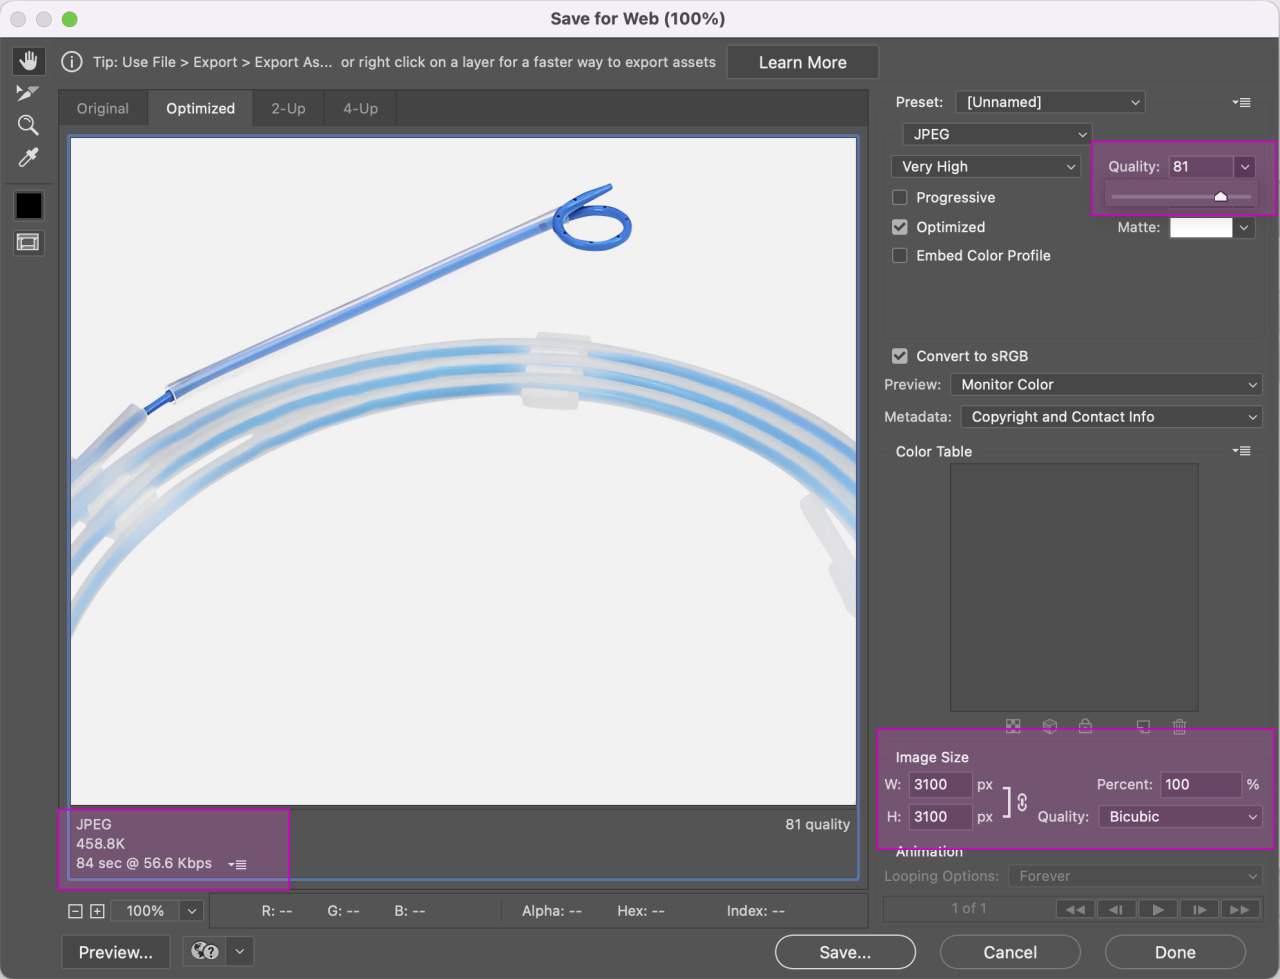
Reducing file size in Photoshop
Most image optimization takes place in Photoshop.
Note: There are many ways to optimize and image; the steps below are just one such way.
- Make sure your image is built at 2x the dimensions
- Navigate to the File menu and hover on Export
- Select Save for Web (Legacy)
- Select the 2-up tab in the new window
- This will let you compare your original image to the optimized image
- Make sure Optimized is checked and that your selected file format is correct
- Play around with the quality slider, where you land will depend on the quality of the original image
- 80% is a good place to start
- Try not to go under 60%


Reducing file size online
There are free online tools, like TinyJPG, that compress images.
Image file types
SVG
(scalable vector graphics)
- Use SVGs wherever possible for the following items
- SVGs are vector images and are infinitely scalable and will not pixelate
- Supports animation
- Supports transparent pixels
- Complex SVGs can have a large file size, but for icons and simpler graphics the file size is usually very low
- Support for millions of colors
JPG
(joint photographic experts group)
- If SVG is not available for use, and you don’t need transparent pixels, a JPG is a good second choice
- Most common image type for photographs or raster images
- Does not support transparent pixels — if you do not add a background color, this file type will always add a white background
- Supports millions of colors in RGB format
PNG
(portable network graphics)
- If SVG is not available for use, and you need transparent pixels, a PNG is a good fallback
- Supports transparent pixels
- Larger file size than JPGs
- Supports millions of colors in RGB format
- Select “compress interlacing” when exporting
GIF
(graphics interchange format)
- Only use when animation is required (this should be very rare, as animation is bad for performance and accessibility)
- Supports transparent pixels
- Usually large file sizes
- Designed for simple images
- Support for 256 colors or less